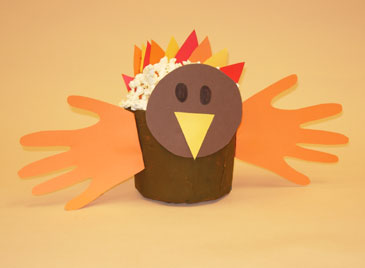
Turkey Bowl
Put out some treats for your Thanksgiving guests, in a homemade bowl you can make with your little Pilgrim.
By: Christine Dvornik
Turkey Bowl

Age: Preschool and up
Time: An afternoon
Type of activity: Holiday Arts and Crafts
This turkey will look great as a centerpiece on your Thanksgiving table! Fill it will fruit, napkins, or other items for your guests.
Materials:- Plastic bowl
- Mixing bowl
- Vaseline
- Newspaper
- Scissors
- Brown tempera paint
- Paintbrush
- Orange, yellow, red, black, and brown construction paper
Directions:
First you're going to make the papier-mache bowl.
- This project is messy, so place newspaper over your entire work area.
- Cut the newspaper into 1-inch wide strips. You'll need at least 50 strips for this project.
- To make the paste, combine an even amount of flour and water in the mixing bowl until it becomes the consistency of pancake batter. Start with one cup of each and add more if necessary.
- Cover the outside of the plastic bowl with Vaseline. This will make it easier to remove the mold from the bowl.
- One at a time, dip a strip of newspaper into the mixture and lay it smoothly over the bowl. Keep adding strips until the bowl is completely covered with one layer of newspaper. To give the bowl more strength, add the first layer in a horizontal pattern, then add a second layer in a vertical pattern. Add a third layer of newspaper strips in a horizontal pattern.
- Place the bowl on top of a layer of newspaper in a cool, dry place. Let the bowl sit for several hours. You may even want to let it sit it overnight.
- hen the bowl is completely dry, gently pull the newspaper mold away from the bowl.
- Paint the bowl brown and set it aside to dry.
- Now, draw and cut out all the shapes you'll need from the construction paper:
- 1 brown circle 4 inches in diameter for the turkey's head
- 10 rocket-shaped tail feathers about 8" x 1" in yellow, red, and orange paper
- 1 small yellow triangle
- 2 tiny black circles for eyes
- Now, you'll make the turkey's wings. To do this, trace your child's hands on a sheet of brown construction paper and cut out the shapes.
- Make sure the bowl is dry before you glue the construction paper parts to the turkey's base. First, glue the tail feathers in a fan shape along the inside edge of the back of the bowl (the feathers should be pointing up).
- Next, glue one of your child's handprints to each side of the turkey to make its wings.
- Glue the turkey's beak and eyes in place on its head.
- Glue the turkey's head to the top edge of the front of the bowl.
Now it's time to make the turkey.